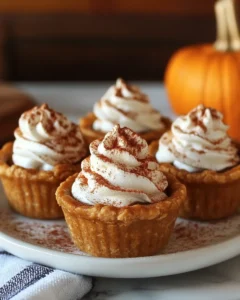
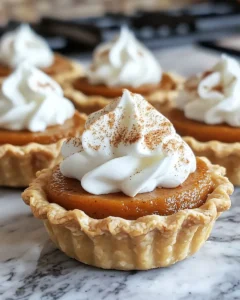
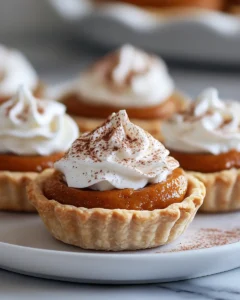
There’s something undeniably comforting about the aroma of pumpkin baking in the oven. Mini pumpkin pies with whipped cream capture the essence of fall, cozy evenings, and festive gatherings in a single, bite-sized treat. Perfect for Thanksgiving, a family dessert night, or even a special autumn brunch, these little pies bring warmth and nostalgia to any occasion.
The inspiration for this recipe comes from childhood memories of helping in the kitchen during the holidays. Watching the golden crusts rise and the pumpkin filling set became a cherished tradition, one that celebrated togetherness, laughter, and the joy of homemade desserts. These mini pies are a modern twist on the classic pumpkin pie, offering an approachable portion size that makes them perfect for sharing. Each pie is delicately spiced, rich in flavor, and topped with a cloud of freshly whipped cream, creating a dessert experience that’s both indulgent and elegant.
Whether you’re hosting a festive gathering or simply craving a sweet treat, these mini pumpkin pies are designed to inspire you to bake with love and share moments of joy. Their charming size makes them ideal for gifting to neighbors, bringing to potlucks, or simply enjoying with a cup of coffee or tea on a crisp autumn evening.
Ingredients
For the Pie Crust:
-
1 ½ cups all-purpose flour
-
½ teaspoon salt
-
1 tablespoon sugar
-
½ cup unsalted butter, cold and cut into cubes
-
3-4 tablespoons ice water
For the Pumpkin Filling:
-
1 cup pumpkin puree (canned or fresh)
-
½ cup brown sugar, packed
-
¼ cup granulated sugar
-
1 teaspoon ground cinnamon
-
½ teaspoon ground nutmeg
-
¼ teaspoon ground ginger
-
¼ teaspoon ground cloves
-
½ teaspoon salt
-
2 large eggs
-
½ cup evaporated milk
For the Whipped Cream:
-
1 cup heavy whipping cream
-
2 tablespoons powdered sugar
-
½ teaspoon pure vanilla extract
Directions
Prepare the Pie Crust
Begin by making the pie crust, the foundation of your mini pumpkin pies. In a large mixing bowl, combine the all-purpose flour, salt, and sugar. Stir these dry ingredients together to ensure even distribution of flavor and seasoning. Next, add the cold, cubed butter to the bowl. Using a pastry cutter, two forks, or even your fingertips, work the butter into the flour mixture until it resembles coarse crumbs. The key here is to keep the butter cold; this creates a flaky texture when baked. Avoid overmixing, as this can make the crust tough.
Once the mixture reaches the desired crumbly consistency, gradually add ice water, one tablespoon at a time. Mix gently until the dough starts to come together. You may not need all the water, so add slowly to avoid making the dough too sticky. When it forms a cohesive ball, flatten it into a disk, wrap it in plastic wrap, and refrigerate for at least 30 minutes. Chilling the dough allows the gluten to relax and the butter to firm up, ensuring a tender and flaky crust for your mini pies.
Preheat the Oven
While the dough is chilling, preheat your oven to 375°F (190°C). Proper oven temperature is crucial for even baking and a perfectly set filling. Prepare a mini muffin or tart pan by lightly greasing the cups or lining them with small paper liners. This step makes removing the pies easier after baking and helps maintain their shape.
Roll and Cut the Dough
Once the dough has chilled, lightly flour your work surface and rolling pin. Roll the dough out to about ⅛-inch thickness, taking care to move it gently to avoid tearing. Use a round cookie cutter slightly larger than your mini muffin cups to cut circles. Each circle will form a small pie shell. Carefully transfer each dough circle into the prepared pan, gently pressing it into the cup and up the sides. This creates a perfect little cup to hold the pumpkin filling. If there is excess dough hanging over the edge, trim it with a small knife for a clean finish.
Make the Pumpkin Filling
In a medium mixing bowl, combine pumpkin puree, brown sugar, granulated sugar, cinnamon, nutmeg, ginger, cloves, and salt. Whisk until the mixture is smooth and all spices are evenly incorporated. This ensures each bite of your mini pies has consistent flavor. Beat in the eggs one at a time, fully incorporating each before adding the next. Finally, stir in the evaporated milk until the filling is creamy and well blended. The mixture should be thick but pourable, with a rich aroma from the warm spices.
Fill the Mini Pies
Using a spoon or small ladle, carefully fill each pie shell about three-quarters full. Leaving space at the top prevents the filling from spilling over during baking. Smooth the surface with the back of the spoon for an even finish. Take your time with this step, as uniform filling helps the pies bake evenly and look professional.
Bake the Mini Pies
Place the filled mini pies in the preheated oven and bake for 20-25 minutes. Keep a close eye on them; the filling should be set and a toothpick inserted into the center should come out clean. If the crust edges start to brown too quickly, cover them with small strips of foil to prevent burning. The aroma of pumpkin and spices filling your kitchen is part of the joy of this recipe.
Cool and Remove from Pan
Once baked, allow the mini pies to cool in the pan for 10-15 minutes. This brief cooling period helps the pies firm up, making them easier to remove. Carefully transfer the pies to a wire rack to cool completely. Cooling is important not just for handling but also to prevent the whipped cream from melting when added later.
Prepare the Whipped Cream
While the pies are cooling, prepare the whipped cream. In a chilled mixing bowl, beat the heavy cream, powdered sugar, and vanilla extract on high speed. Watch closely and stop once soft peaks form. Overwhipping can result in a grainy texture, so aim for a light, fluffy consistency that is easy to pipe or spoon onto the pies.
Top the Pies
Once the mini pies are fully cooled, add a generous dollop of whipped cream to each one. You can use a piping bag for a decorative swirl or simply spoon it on for a rustic look. For an extra touch, sprinkle a pinch of cinnamon, nutmeg, or even place a small piece of chocolate on top. This finishing touch not only adds flavor but also makes the pies visually appealing.
Serve and Enjoy
Your mini pumpkin pies are now ready to serve. Enjoy them immediately for the best texture, or refrigerate until ready. These bite-sized desserts pair beautifully with coffee, hot cocoa, or a spiced cider. Their charming size, comforting flavor, and delicate presentation make them perfect for family gatherings, holiday parties, or simply indulging in a cozy evening treat.
Tips for Perfect Mini Pumpkin Pies
-
Chill the Dough: Cold dough ensures a flaky, tender crust. Avoid overworking the dough to prevent toughness.
-
Use Fresh Spices: Freshly ground cinnamon, nutmeg, and cloves elevate the flavor and aroma of your pumpkin filling.
-
Avoid Overfilling: Fill the crusts about three-quarters full to prevent spills and ensure a neat presentation.
-
Cool Before Topping: Always cool the pies completely before adding whipped cream to prevent it from melting.
-
Make Ahead: You can bake the pies a day in advance and store them in the refrigerator, adding whipped cream just before serving.
Variations and Flavor Enhancements
Mini pumpkin pies are wonderfully versatile, allowing you to experiment with flavors and textures:
-
Chocolate Drizzle: Add a light drizzle of melted dark chocolate over the whipped cream for a decadent touch.
-
Gingersnap Crust: Substitute the traditional pie crust with crushed gingersnap cookies for extra spice and crunch.
-
Maple Whipped Cream: Replace powdered sugar with maple syrup for a subtle, autumnal sweetness.
-
Nut Topping: Sprinkle toasted pecans or walnuts on top for added texture and a nutty flavor.
-
Spiced Whipped Cream: Add a pinch of cinnamon or pumpkin pie spice to the whipped cream for a more festive presentation.
These small tweaks make the recipe uniquely yours and provide endless possibilities for seasonal flair.
Why Mini Pies Are Perfect for Any Occasion
Mini pumpkin pies are not only visually appealing but also convenient for serving at gatherings. Unlike traditional pies that require slicing and plating, these single-serving treats eliminate the need for utensils and make portion control effortless. They’re perfect for potlucks, office parties, and even casual weekend desserts.
Additionally, mini pies have a cozy, nostalgic quality. Their small size invites indulgence without overdoing it, making them ideal for children and adults alike. Whether you’re hosting a Thanksgiving dinner, a fall-themed brunch, or a cozy evening at home, these pies are sure to impress. The combination of tender crust, spiced pumpkin filling, and fluffy whipped cream creates a flavor profile that’s classic yet modern, comforting yet sophisticated.
Frequently Asked Questions
Can I use a store-bought pie crust?
Absolutely! Using a pre-made pie crust is a great option, especially if you’re short on time or new to baking. Store-bought crusts are convenient and can save you the effort of making dough from scratch. When choosing a brand, opt for a high-quality crust with minimal additives for the best texture and flavor. Keep in mind that pre-made dough should also be chilled before baking to ensure it remains flaky. You can lightly press it into your mini muffin tin or tart pan the same way you would with homemade dough. Some pre-made crusts come rolled and ready to cut, which makes shaping the mini pies quick and easy.
Can I freeze mini pumpkin pies?
Yes, mini pumpkin pies freeze very well, making them perfect for preparing ahead of a busy holiday schedule. Bake the pies completely and allow them to cool fully before freezing. Place the cooled pies in a single layer on a baking sheet and freeze for about an hour to prevent them from sticking together. Then transfer them to an airtight container or freezer-safe bag for long-term storage. When ready to serve, thaw the pies in the refrigerator for several hours or overnight. Add the whipped cream topping just before serving to maintain its light and fluffy texture. Frozen pies can be stored for up to 2 months without compromising flavor or texture.
Can I make the pumpkin filling ahead of time?
Yes, the pumpkin filling can be prepared 1-2 days in advance and stored in the refrigerator. This makes assembling the pies much faster, especially if you’re preparing a large batch for a gathering. Store the filling in an airtight container, and give it a quick stir before spooning it into the pie shells. Baking the pies with pre-made filling is the same as if it were freshly mixed, and the flavors will still be rich and well-balanced. Preparing the filling ahead also allows the spices to meld together, enhancing the depth of flavor in your mini pies.
What type of pumpkin should I use?
Canned pumpkin puree is ideal for this recipe because it’s convenient, consistent in texture, and has a rich, naturally sweet flavor. Be sure to use plain pumpkin puree, not pumpkin pie filling, which contains added sugar and spices. If you prefer to use fresh pumpkin, select a sugar or pie pumpkin variety, roast it until tender, and then puree it until smooth. Fresh pumpkin offers a slightly brighter, fresher flavor, but canned pumpkin is more reliable for consistent results and ease of use.

Mini Pumpkin Pies With Whipped Cream Recipe
- Total Time: 55 minutes
- Yield: 12 mini pies 1x
Description
A cozy autumn dessert that’s perfect for holiday gatherings or a sweet treat on a crisp evening. These mini pumpkin pies are spiced to perfection, topped with fluffy whipped cream, and designed to impress both in flavor and presentation. Their small size makes them perfect for sharing, gifting, or enjoying as a personal indulgence.
Ingredients
For the Pie Crust:
-
1 ½ cups all-purpose flour
-
½ teaspoon salt
-
1 tablespoon sugar
-
½ cup unsalted butter, cold and cut into cubes
-
3–4 tablespoons ice water
For the Pumpkin Filling:
-
1 cup pumpkin puree (canned or fresh)
-
½ cup brown sugar, packed
-
¼ cup granulated sugar
-
1 teaspoon ground cinnamon
-
½ teaspoon ground nutmeg
-
¼ teaspoon ground ginger
-
¼ teaspoon ground cloves
-
½ teaspoon salt
-
2 large eggs
-
½ cup evaporated milk
For the Whipped Cream:
-
1 cup heavy whipping cream
-
2 tablespoons powdered sugar
-
½ teaspoon pure vanilla extract
Instructions
-
In a large mixing bowl, combine flour, salt, and sugar for the pie crust. Add cold butter cubes and mix until the mixture resembles coarse crumbs. Gradually add ice water, one tablespoon at a time, until the dough comes together. Form into a disk, wrap in plastic, and refrigerate for at least 30 minutes.
-
Preheat the oven to 375°F (190°C). Lightly grease a mini muffin or tart pan, or line with small paper liners.
-
Roll out the chilled dough to about ⅛-inch thickness on a lightly floured surface. Cut circles slightly larger than the muffin cups and gently press into the pan to form pie shells.
-
In a medium bowl, whisk together pumpkin puree, brown sugar, granulated sugar, cinnamon, nutmeg, ginger, cloves, and salt. Beat in eggs one at a time, then stir in evaporated milk until smooth and well combined.
-
Spoon the pumpkin filling into each pie shell, filling about ¾ full. Smooth the tops with a spoon.
-
Bake for 20-25 minutes, or until the filling is set and a toothpick comes out clean. If crust edges brown too quickly, cover with foil.
-
Allow pies to cool in the pan for 10-15 minutes, then transfer to a wire rack to cool completely.
-
Beat heavy cream, powdered sugar, and vanilla extract in a chilled bowl until soft peaks form. Do not overwhip.
-
Top each cooled pie with whipped cream. Garnish with a sprinkle of cinnamon or a small piece of chocolate if desired.
-
Serve immediately or refrigerate until ready to enjoy.
Notes
-
Keep the dough cold for a flaky crust.
-
Adjust spices to taste.
-
Cool pies completely before adding whipped cream to prevent melting.
-
Mini pies can be made ahead and stored in the refrigerator; add whipped cream just before serving.
-
Fresh pumpkin can be used instead of canned; roast and puree for best results.
- Prep Time: 30 minutes
- Cook Time: 25 minutes

