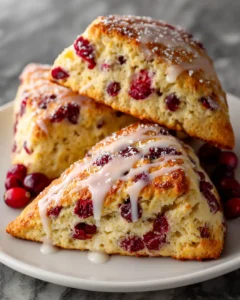
There’s nothing quite like the comforting aroma of freshly baked scones wafting through your kitchen on a crisp morning. Cranberry Orange Scones strike the perfect balance between tart and sweet, with juicy cranberries and zesty orange flavor brightening each bite. Whether you’re hosting a festive brunch, enjoying a cozy afternoon tea, or simply treating yourself to a warm breakfast, these scones are versatile enough to fit any occasion.
This recipe was inspired by a cherished holiday tradition of gathering with family to enjoy homemade baked goods. Each bite carries the essence of cozy winter mornings and cheerful holiday celebrations. The addition of orange zest elevates the flavor, while dried cranberries provide bursts of tartness that complement the tender, buttery crumb. Perfectly crisp on the outside and soft on the inside, these scones are ideal for pairing with a cup of tea or coffee, making them a delightful treat for any time of year.
Ingredients You’ll Need
For the best results, it’s important to use fresh, high-quality ingredients. Here’s what you’ll need to make approximately 8-10 scones:
-
2 cups all-purpose flour – Provides structure for tender scones.
-
1/3 cup granulated sugar – Adds just the right amount of sweetness.
-
1 tablespoon baking powder – Ensures a light, fluffy texture.
-
1/2 teaspoon salt – Balances flavors.
-
1/2 cup unsalted butter, cold and cubed – Key for a buttery, flaky texture.
-
1/2 cup dried cranberries – For sweet-tart bursts in every bite.
-
1 tablespoon orange zest – Brightens the flavor.
-
2/3 cup heavy cream – Keeps scones moist and tender.
-
1 teaspoon vanilla extract – Adds depth and warmth.
-
Optional glaze: 1 cup powdered sugar mixed with 2–3 tablespoons fresh orange juice
Step-by-Step Instructions
Follow these steps carefully to create Cranberry Orange Scones that are tender, flaky, and bursting with flavor. Each step includes tips to ensure your scones turn out perfectly golden and delicious.
1. Preheat Your Oven
Start by preheating your oven to 400°F (200°C). Proper preheating is essential because scones need a hot environment to rise quickly and develop a crisp, golden crust. While the oven warms, line a baking sheet with parchment paper or a silicone baking mat. This prevents sticking and helps with even browning. A well-prepared baking surface also ensures the scones slide off easily without losing their shape.
2. Mix Dry Ingredients
In a large mixing bowl, whisk together 2 cups of all-purpose flour, 1/3 cup granulated sugar, 1 tablespoon baking powder, and 1/2 teaspoon salt. Whisking incorporates air into the flour, helping the scones rise better, and ensures the sugar, salt, and baking powder are evenly distributed. Take a moment to admire how these simple ingredients form the base of a perfectly balanced, flavorful scone.
3. Cut in the Butter
Cold butter is the secret to flaky scones. Add 1/2 cup of cubed, unsalted butter to the dry mixture. Using a pastry cutter, two forks, or even your fingertips, cut the butter into the flour until the mixture resembles coarse crumbs, with pea-sized pieces of butter remaining. Work quickly so the butter stays cold. These tiny pockets of butter melt during baking, creating delicate, flaky layers inside each scone. If the butter becomes too soft, chill the mixture for a few minutes before continuing.
4. Add Cranberries and Orange Zest
Once your butter is cut in, fold in 1/2 cup dried cranberries and 1 tablespoon fresh orange zest. These ingredients bring the scones to life—cranberries add bursts of sweet-tart flavor, while orange zest provides a bright, aromatic note. Make sure they’re evenly distributed so that every scone has a balanced combination of fruit and citrus. Using fresh orange zest is crucial, as it releases essential oils that enhance the overall aroma and taste.
5. Incorporate the Wet Ingredients
In a separate small bowl, combine 2/3 cup heavy cream with 1 teaspoon vanilla extract. Gradually pour this mixture into the dry ingredients while gently folding the dough with a spatula. Be careful not to overmix; overworked dough can become dense and tough. The goal is a slightly sticky, cohesive dough that holds together but still feels tender. If it seems too dry, add an extra tablespoon of cream; if too wet, sprinkle in a little flour.
6. Shape the Dough
Transfer the dough to a lightly floured surface. Pat it gently into a round disc about 1 inch thick. The thickness ensures a soft, fluffy interior while allowing the edges to crisp. Using a sharp knife or pizza cutter, cut the disc into 8 equal wedges. For bite-sized scones, divide the dough into smaller portions instead. When shaping, handle the dough lightly to preserve the flakiness created by the butter.
7. Bake to Perfection
Place the scones on the prepared baking sheet, leaving 1–2 inches between each wedge. This spacing allows heat to circulate evenly. Bake for 18–22 minutes, keeping a close eye on them in the last few minutes. You’re looking for golden-brown tops with slightly crisp edges. A toothpick inserted into the center should come out clean, signaling that the scones are fully baked. Let them cool on the baking sheet for 5 minutes before transferring to a wire rack to prevent sogginess.
8. Optional Glaze
While the scones are cooling slightly, prepare a simple glaze by whisking together 1 cup powdered sugar with 2–3 tablespoons fresh orange juice until smooth. Drizzle it over the warm scones to add a touch of sweetness and enhance the citrus flavor. This glaze creates a beautiful finish and adds a subtle shine, making your scones visually appealing as well as delicious. For a thicker glaze, use less juice; for a thinner, more drizzle-able glaze, add a little more juice.
By carefully following these steps and paying attention to small details like cold butter, even distribution of cranberries, and proper baking temperature, you’ll achieve scones that are perfectly golden on the outside, soft on the inside, and bursting with sweet-tart orange and cranberry flavor.
Tips for the Perfect Scones
-
Keep ingredients cold: Using cold butter and cream ensures a flaky texture.
-
Do not overmix: Handle the dough gently to avoid tough scones.
-
Fresh zest matters: Freshly grated orange zest provides a brighter, more aromatic flavor than pre-packaged zest.
-
Adjust sweetness: If you prefer less sweet scones, reduce the sugar slightly or skip the glaze.
-
Storage: Store baked scones in an airtight container at room temperature for up to 3 days, or freeze for up to 2 months.
Why Cranberry Orange Scones Are a Must-Try
These scones are more than just a breakfast treat—they’re a sensory experience. The contrast between the tart cranberries and sweet orange glaze makes each bite unforgettable. Their tender texture and golden crust create a perfect balance that’s both comforting and sophisticated.
Scones like these are ideal for holiday gatherings, brunches, or even as a homemade gift. They’re simple enough for a weekday morning yet elegant enough for entertaining guests. Pair them with a hot cup of tea, coffee, or even a glass of fresh orange juice to create a delightful, memorable meal.
Variations to Elevate the Recipe
-
White Chocolate Cranberry Scones: Add 1/2 cup white chocolate chips for an indulgent twist.
-
Orange Glaze with Liqueur: Mix a splash of Grand Marnier into the glaze for an adult-friendly version.
-
Whole Wheat Option: Substitute half of the all-purpose flour with whole wheat flour for a nuttier flavor.
-
Nutty Delight: Add 1/4 cup chopped pecans or almonds for extra crunch.
Serving Suggestions
Cranberry Orange Scones are incredibly versatile and can be enjoyed in numerous ways:
-
Breakfast: Serve warm with butter or cream cheese.
-
Afternoon Tea: Pair with herbal tea or a latte for a relaxing break.
-
Holiday Brunch: Decorate with a drizzle of glaze and fresh cranberries for a festive presentation.
-
Gifts: Wrap a batch in parchment paper and tie with a ribbon for a thoughtful homemade gift.
Frequently Asked Questions
1. Can I use frozen cranberries instead of dried?
Yes! Frozen cranberries can be used, but there are a few important adjustments to consider. Chop the cranberries finely and pat them dry with a paper towel to remove excess moisture. This prevents the dough from becoming too wet and helps the scones hold their shape. Because frozen cranberries contain more water than dried ones, you may need to slightly reduce the amount of heavy cream in the recipe to maintain the right dough consistency. Keep in mind that the flavor will be slightly more tart, which can be balanced with a little extra sugar or a glaze if desired.
2. Can I make the dough ahead of time?
Absolutely! Making the dough ahead of time is a great way to save time and enhance flavor. After mixing the dough, shape it into a round disc, wrap it tightly in plastic wrap, and refrigerate for up to 24 hours. Chilling the dough allows the butter to firm up and the flavors to meld, making it easier to cut clean wedges without the dough sticking. You can also freeze the dough at this stage for longer storage—simply wrap it well and freeze for up to a month. When ready to bake, thaw in the refrigerator and proceed with cutting and baking.
3. Can I freeze baked scones?
Yes, baked scones freeze beautifully. Allow the scones to cool completely to prevent condensation, then wrap them individually in plastic wrap and store in a freezer-safe bag. This ensures they retain freshness and texture. Frozen scones can be stored for up to 2 months. To enjoy, reheat them in a preheated oven at 350°F (175°C) for 10–12 minutes, or until warmed through. This method helps preserve the crisp exterior while keeping the interior soft and tender.
4. How do I get a flaky texture?
Achieving flaky scones relies on three key techniques: using cold butter, working quickly, and avoiding overmixing. Cold butter creates small pockets that release steam during baking, separating the layers and creating a light, flaky interior. Handle the dough gently and mix just until it comes together. Overworking can make the scones dense and tough, so patience and careful technique are essential.
5. Can I make a vegan version?
Yes! To make these scones vegan, substitute the butter with a plant-based alternative such as vegan margarine or coconut oil. Use non-dairy cream, like coconut cream, almond milk, or soy milk, to replace heavy cream. You may need to adjust the sweetness slightly, as some non-dairy milks are less rich than cream. The result will still be tender, flavorful scones with a delicious cranberry-orange combination.


