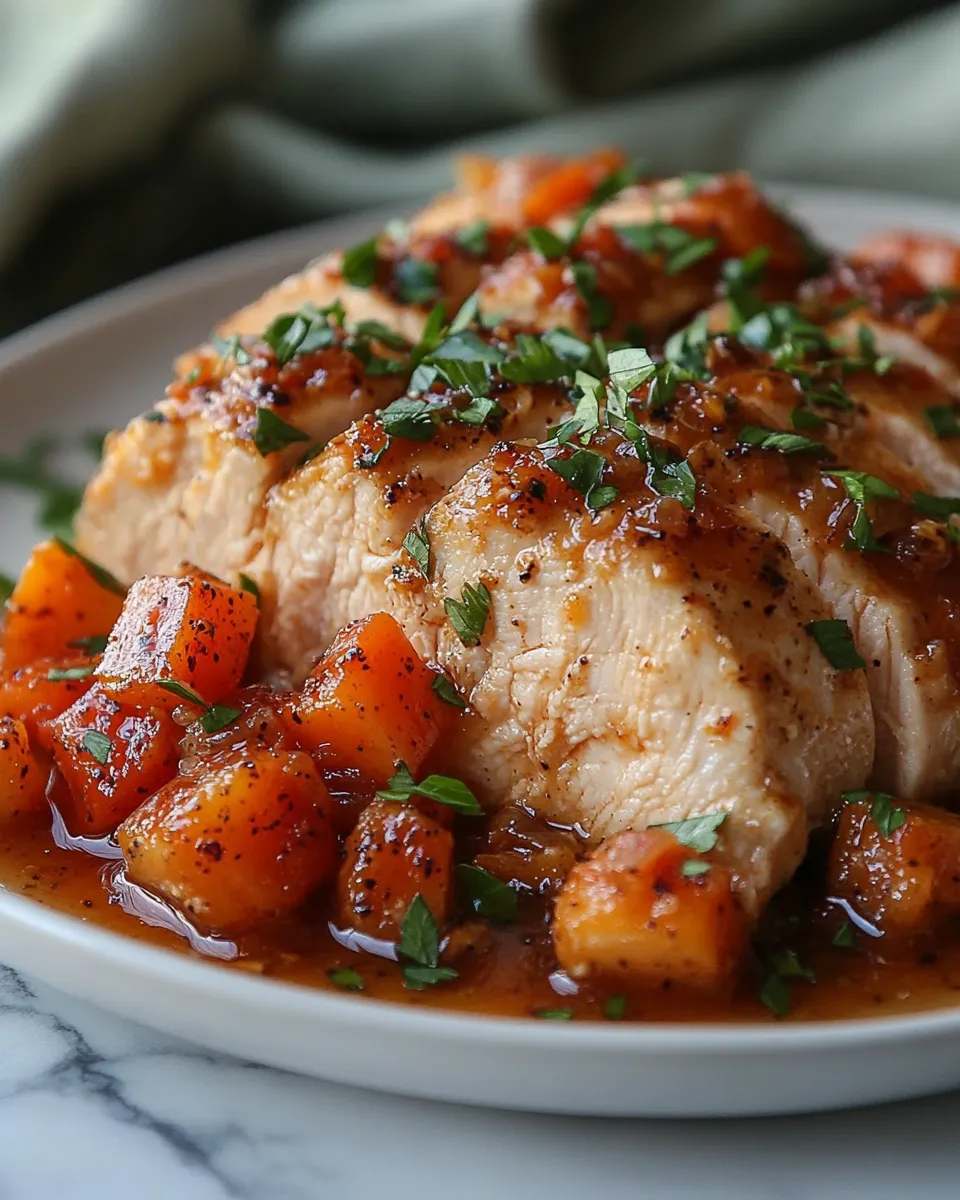

There’s something deeply comforting about a dish that combines heat, sweetness, and a sticky glaze that clings to each tender bite. Sticky Honey Gochujang Chicken is exactly that kind of dish — bold, balanced, and incredibly satisfying. Whether you’re planning a cozy weeknight dinner, impressing guests on a casual Friday night, or looking to spice up your meal prep routine, this Korean-inspired chicken dish fits the bill.
The inspiration for this recipe came from a late summer barbecue where traditional hot wings met Korean flavors. A friend introduced me to gochujang, the iconic Korean fermented chili paste, and it immediately changed how I thought about spice. Blending it with honey, garlic, and soy created a flavor explosion that’s both addictive and approachable. From that day on, this sticky chicken has become a staple in my kitchen—and now, I’m excited to share it with you.
What is Gochujang?
Before we dive into the recipe, let’s take a moment to appreciate the star of this dish: gochujang. It’s a Korean fermented chili paste made from red chili powder (gochugaru), glutinous rice, fermented soybeans, and salt. The result is a complex, umami-rich paste with a deep red hue and a slightly sweet, smoky heat that lingers just enough to keep you coming back for more.
Unlike sriracha or other hot sauces, gochujang is thick and concentrated, making it perfect for marinades, glazes, and sauces that need both depth and punch. It’s widely available in most grocery stores now, especially in the international aisle, or online.
Why You’ll Love This Recipe
This Sticky Honey Gochujang Chicken is:
-
Sweet, spicy, and sticky – the trifecta of flavor
-
Quick to make – ready in under 40 minutes
-
Made with pantry-friendly ingredients
-
Great for meal prep – the flavors intensify over time
-
Customizable – works with wings, thighs, drumsticks, or even tofu
It’s the kind of recipe that transforms everyday ingredients into something that tastes restaurant-worthy, all in the comfort of your own kitchen.
Ingredients
Here’s everything you’ll need to make Sticky Honey Gochujang Chicken. Most of these ingredients are likely already in your kitchen:
For the Chicken
-
2 pounds of boneless, skinless chicken thighs or drumsticks
-
1 tablespoon vegetable oil
-
Salt and pepper to taste
For the Marinade & Glaze
-
3 tablespoons gochujang (Korean chili paste)
-
2 tablespoons soy sauce
-
2 tablespoons rice vinegar (or apple cider vinegar)
-
1 tablespoon sesame oil
-
1/4 cup honey
-
3 cloves garlic, minced
-
1 tablespoon grated fresh ginger
-
1 tablespoon brown sugar (optional, for extra sweetness)
-
1 tablespoon water (to loosen the sauce if needed)

Optional Garnishes
-
Toasted sesame seeds
-
Sliced green onions
-
Steamed rice or noodles, for serving
-
Quick pickled cucumbers or kimchi on the side
Directions
Follow these detailed steps to achieve the perfect balance of heat, sweetness, and savory richness in every bite of Sticky Honey Gochujang Chicken.
1. Prepare the Marinade
Start by preparing the marinade, which also doubles as your sticky glaze. In a medium mixing bowl, whisk together the gochujang, soy sauce, rice vinegar, sesame oil, honey, minced garlic, grated ginger, and brown sugar. These ingredients work together to create a flavorful blend that’s sweet, spicy, tangy, and umami-rich.
If the mixture is too thick to pour or mix easily, add about 1 tablespoon of water to loosen it up. You want the consistency to be thick enough to coat the chicken but fluid enough to use as a basting glaze later.
Once your marinade is smooth and well-mixed, separate about 1/3 of it into a small bowl. Set this portion aside—it will be used later during the cooking process to glaze the chicken and give it that irresistible sticky finish.
2. Marinate the Chicken
Place your chicken pieces in a large zip-top bag or a glass bowl. Pour the remaining 2/3 of the marinade over the chicken, making sure every piece is well-coated. Use clean hands or tongs to toss the chicken in the marinade so the flavors distribute evenly.
Seal the bag or cover the bowl tightly with plastic wrap. Refrigerate for at least 30 minutes, though 2 hours is ideal for maximum flavor absorption. For even better results, you can marinate it overnight. The longer the chicken sits in the marinade, the more flavorful and tender it will be.
3. Preheat Your Oven or Grill
While the chicken is marinating, prepare your cooking method.
-
Oven method: Preheat your oven to 425°F (220°C). Line a baking sheet with aluminum foil for easy cleanup, then place a wire rack on top. This allows air to circulate around the chicken, helping it cook evenly and get a slightly crisp edge.
-
Grill method: Preheat your grill to medium-high heat. Lightly oil the grates to prevent the chicken from sticking. You can also use a grill pan if cooking indoors.
4. Cook the Chicken
Once marinated, remove the chicken from the bag or bowl and let any excess marinade drip off. Discard the used marinade.
Arrange the chicken pieces on the oven rack or grill grates, spacing them evenly to ensure even cooking.
-
Oven: Bake the chicken for 20 minutes, flipping halfway through for even browning. After 20 minutes, brush the tops generously with the reserved glaze. Return to the oven and cook for an additional 5 to 7 minutes, or until the glaze is bubbling and caramelized and the internal temperature of the chicken reaches 165°F (74°C).
-
Grill: Grill each side of the chicken for about 5 to 6 minutes, depending on thickness. In the last few minutes, brush the reserved glaze over the chicken and allow it to cook until slightly charred and glossy. Be sure not to burn the glaze, as it contains honey and sugar, which caramelize quickly.

5. Finish with a Final Glaze
When the chicken is cooked through and beautifully golden with a sticky coating, remove it from the heat and place it on a serving plate. While it’s still hot, brush on any remaining glaze to give it that final shiny finish.
Let the chicken rest for 5 minutes before serving. This allows the juices to redistribute throughout the meat, keeping it moist and flavorful with every bite.
Serve hot with your favorite sides like rice, noodles, or vegetables—and enjoy!
Serving Suggestions
Sticky Honey Gochujang Chicken is incredibly versatile. Here are some serving ideas to suit every occasion:
-
With Steamed Jasmine or Basmati Rice: The rice helps mellow the heat and soaks up the delicious glaze.
-
Over Cold Noodles: Perfect for summer—add some sesame oil, cucumber ribbons, and scallions.
-
In a Rice Bowl: Layer chicken with rice, sautéed spinach, shredded carrots, and a fried egg for a Bibimbap-style meal.
-
With Kimchi or Pickled Veggies: The tangy crunch balances the sticky heat beautifully.
-
As a Party Appetizer: Use chicken wings or drumettes and serve with toothpicks.
Tips for Success
-
Don’t skip the marinade time – It’s essential for infusing flavor.
-
Use skin-on chicken for extra richness – If you love crispy, sticky skin, go for bone-in thighs or drumsticks with the skin left on.
-
Watch the glaze – The sugar and honey can burn quickly, so keep an eye on your chicken, especially during the final few minutes.
-
Double the sauce – Want extra for dipping or drizzling over rice? Make a larger batch and simmer it on the stovetop for a few minutes to thicken before serving.
How Spicy Is It?
Gochujang brings medium-level heat to the dish — not overwhelming, but definitely noticeable. The honey and brown sugar tame the fire, creating a perfect balance.
If you’re heat-sensitive, reduce the gochujang to 2 tablespoons or add a little more honey. If you love it extra spicy, add a squirt of sriracha or a pinch of red pepper flakes.

Storage and Meal Prep Tips
This recipe keeps really well and actually tastes better the next day as the sauce continues to penetrate the meat.
-
Storage: Store leftovers in an airtight container in the fridge for up to 4 days.
-
Reheat: Warm in the microwave or in a skillet over low heat. Add a splash of water or broth to loosen the sauce if needed.
-
Freezer: Freeze cooked chicken for up to 3 months. Thaw overnight in the fridge before reheating.
-
Meal prep idea: Make a large batch and portion with rice and veggies in meal prep containers for a full week of lunches.
Frequently Asked Questions
1. Can I make Sticky Honey Gochujang Chicken ahead of time?
Absolutely. This recipe is great for prepping in advance. You can marinate the chicken up to 24 hours ahead, allowing the flavors to fully soak in. If you’re planning for a busy evening, simply prep the chicken the night before, cover, and refrigerate. Once cooked, the chicken stores well in the refrigerator for up to 4 days in an airtight container. It also freezes beautifully. Just let the chicken cool completely, then store it in freezer-safe containers or bags for up to 3 months. When you’re ready to enjoy, reheat gently in a skillet with a splash of water or broth to loosen the glaze.
2. What can I serve with it besides plain rice?
While sticky white rice is a traditional and delicious pairing, this versatile dish goes well with a wide variety of sides. For something hearty, try serving it with garlic butter noodles, sesame soba, or even mashed sweet potatoes for a sweet-savory contrast. Looking for lighter options? Serve the chicken over a fresh green salad with cucumbers and shredded carrots or wrap it in crisp lettuce leaves for a low-carb twist. Steamed or roasted vegetables like broccoli, snap peas, or bok choy also complement the bold flavor of the glaze perfectly.
3. Is this recipe gluten-free?
It can easily be made gluten-free with a few simple swaps. Gochujang and soy sauce often contain wheat, so be sure to check labels carefully. Look for a gluten-free certified gochujang (available in many health food stores or online). Replace soy sauce with tamari or coconut aminos, both of which are excellent gluten-free alternatives. All the other ingredients in the marinade—honey, garlic, sesame oil, vinegar—are naturally gluten-free, making this dish adaptable for gluten-sensitive diets.
4. Can I make this in an air fryer instead of baking or grilling?
Yes, the air fryer works wonderfully for this recipe. Preheat the air fryer to 375°F (190°C). Arrange the marinated chicken in a single layer in the basket, ensuring pieces aren’t overlapping. Cook for 12 to 16 minutes, flipping halfway through. Brush with the reserved glaze during the final few minutes to get that sticky, caramelized finish. Always check that the internal temperature reaches 165°F (74°C) for safe doneness.