Why You’ll Love This Recipe
Friend, let me tell you—this Melt In Your Mouth Chicken Breast recipe is the kind of dish that’ll have your family scraping their plates and asking for seconds (maybe even thirds). It’s the kind of meal that feels like a Sunday supper but is easy enough to toss together on a Tuesday night when you’re running on fumes.
What makes it special? Well, it’s tender, juicy, and packed with flavor, thanks to a simple blend of pantry staples and a creamy topping that bakes up golden and delicious. You don’t need anything fancy—just a few humble ingredients and a little oven time. It’s the kind of recipe that gives back more than it takes.
It’s perfect for busy nights, potlucks, or those moments when you want to feed someone a meal that says, “I care.” It’s comfort food, plain and simple—no fluff, no fuss. Just melt-in-your-mouth goodness that’ll fill your kitchen with mouthwatering smells and your table with happy faces.
So whether you’re cooking for your family, your neighbors, or just yourself with leftovers to spare, this recipe is bound to become a go-to in your collection. It sure is in mine.
Ingredients You’ll Need
This recipe keeps things simple and comforting—just like the kind of cooking I grew up with. You won’t need a long grocery list or fancy ingredients. In fact, you probably already have most of these tucked in your pantry or fridge. Here’s what you’ll need to make this melt-in-your-mouth magic happen.
For the Chicken
-
4 boneless, skinless chicken breasts (about 6 to 8 ounces each)
You want them nice and plump, but not too thick—if they’re extra thick, give them a quick slice lengthwise to help them cook evenly. -
1 teaspoon garlic powder
Adds a warm, savory flavor that soaks right into the chicken as it bakes. -
1 teaspoon onion powder
A little boost of flavor that pairs beautifully with the creamy topping. -
1/2 teaspoon paprika
Gives a touch of color and a subtle smokiness without overpowering the dish. -
Salt and pepper to taste
I usually go with about 1/2 teaspoon salt and 1/4 teaspoon black pepper, but feel free to adjust depending on your taste. -
1 tablespoon olive oil or melted butter
This helps the seasoning stick and adds a little richness to the chicken as it cooks.

For the Creamy Topping
-
1 cup mayonnaise
Yes, mayonnaise! It keeps the chicken incredibly moist and tender—don’t worry, it won’t taste “mayonnaise-y” once it’s baked. -
1/2 cup grated Parmesan cheese
Freshly grated is always best, but the kind in the green shaker works just fine too. -
1 teaspoon Italian seasoning
A little dried herb blend to bring everything together. -
1/2 teaspoon garlic powder
A second layer of garlic flavor that mingles right into that creamy topping. -
1/4 teaspoon black pepper
Just a little kick to balance out the creaminess.
That’s it! No fancy sauces, no fussy prep. Just a few ingredients coming together to make something truly comforting. It’s the kind of meal that feels like a warm hug at the end of a long day—and the best part is, you don’t need to spend all day in the kitchen to enjoy it.
How to Make Melt In Your Mouth Chicken Breast
This recipe is one of those gems that feels like you’ve worked hard in the kitchen—even though the oven’s doing most of the heavy lifting. With just a little prep and a short bake, you’ll have a tender, juicy chicken dish that practically melts on your fork. Let’s walk through it step-by-step, just like I would with a friend over coffee at my kitchen table.
Step 1: Preheat and Prepare the Chicken
First things first—go ahead and preheat your oven to 375°F (190°C). You want that oven good and hot so the chicken cooks evenly and the topping gets that nice golden finish.
While the oven warms up, grab a 9×13-inch baking dish and give it a light greasing with cooking spray or a little dab of butter. This keeps the chicken from sticking and makes cleanup a whole lot easier later on.
Now, take your 4 boneless, skinless chicken breasts and place them in the dish. If they’re thick, you can slice them in half horizontally to make cutlets, or gently pound them out to an even thickness using a meat mallet or rolling pin. This helps everything cook at the same rate, so you don’t end up with dry edges and raw centers.
Once they’re in the dish, drizzle 1 tablespoon of olive oil or melted butter over the top, then sprinkle on your seasonings:
-
1 teaspoon garlic powder
-
1 teaspoon onion powder
-
1/2 teaspoon paprika
-
Salt and pepper to taste
Give the chicken a light rub to help the seasoning stick, then set it aside while you whip up the topping.

Step 2: Mix the Creamy Topping
In a medium bowl, combine:
-
1 cup mayonnaise
-
1/2 cup grated Parmesan cheese
-
1 teaspoon Italian seasoning
-
1/2 teaspoon garlic powder
-
1/4 teaspoon black pepper
Give it a good stir until it’s smooth and well blended. The mixture should be thick and creamy, almost like a spread. Don’t worry—this topping won’t stay gloopy once it bakes. It transforms into a golden, bubbly crust that seals in all the juices and keeps the chicken moist and tender.
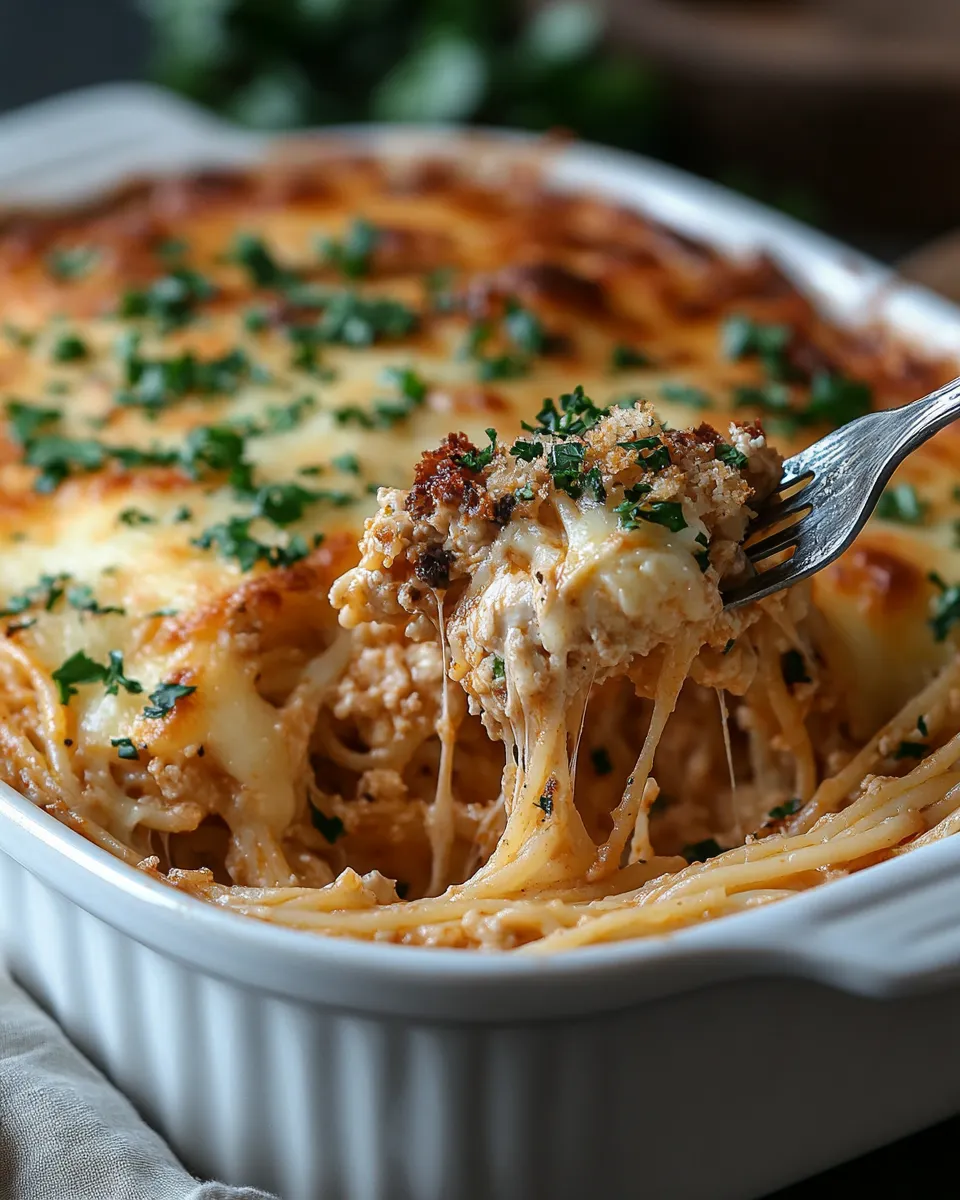
Step 3: Spread and Bake
Now it’s time to dress the chicken. Spoon the creamy topping right over each piece, using the back of your spoon or a spatula to spread it evenly. You want each breast covered edge to edge, like you’re frosting a little savory cake.
Pop the dish into your preheated oven and bake for 35 to 40 minutes, or until the chicken reaches an internal temperature of 165°F (74°C). The top should be golden and slightly crisp, and the chicken will be fork-tender underneath.
If you like a little extra color or crispness, you can turn on the broiler for the last 2–3 minutes—just keep a close eye on it so it doesn’t burn.
Step 4: Serve and Enjoy
Once it’s out of the oven, let the chicken rest for about 5 minutes. That little pause helps the juices settle, making each bite even more tender.
Serve it up with your favorite sides—maybe some fluffy mashed potatoes, roasted green beans, or a big scoop of buttery rice. And don’t forget a hunk of warm bread to swipe up every last bit of that creamy, cheesy goodness from the plate.
This dish is pure comfort food through and through. It’s the kind of meal that brings folks to the table without even needing to call them twice. Whether you’re cooking for your family or just yourself, it’s a simple recipe that feels a little special—and it’s one you’ll want to make again and again.

Tips for the Best Results
This recipe is as simple as they come, but a few little tricks can take it from good to downright unforgettable. Here are my go-to tips for getting the best flavor and texture every single time.
Use Full-Fat Ingredients for Rich Flavor
Now’s not the time to reach for light mayo or reduced-fat cheese. Trust me—full-fat mayonnaise and real Parmesan cheese make a world of difference here. They create that luscious, creamy topping that melts down into the chicken as it bakes, keeping everything moist and flavorful. Low-fat versions just don’t hold up the same way and can sometimes separate or turn watery in the oven. If you’re going for comfort, go all in.
Don’t Overcook the Chicken
Chicken breast is lean, which means it can dry out quickly if left in the oven too long. To keep it juicy, bake just until the internal temperature hits 165°F (74°C)—no more. If you’re not sure, a simple meat thermometer is a home cook’s best friend. Start checking around the 35-minute mark, especially if your chicken pieces are on the thinner side. Perfectly cooked chicken should be tender, not tough.
Let It Rest Before Serving
This might be the hardest part—especially when your kitchen smells amazing—but give the chicken 5 minutes to rest before you dig in. That short wait allows the juices to redistribute, so every bite stays tender and moist. It’s a small step that makes a big difference, especially if you’re serving guests or saving leftovers.
Follow these tips, and you’ll have a dish that’s melt-in-your-mouth perfect every single time!

Frequently Asked Questions (FAQs)
Every good recipe comes with a few “what ifs,” and I’m here to answer them just like I would if you were standing at my kitchen counter, coffee in hand. Let’s walk through a few of the most common questions I get about this melt-in-your-mouth favorite.
Can I use chicken thighs instead?
Absolutely! Boneless, skinless chicken thighs work beautifully in this recipe. They’re naturally more flavorful and forgiving if you accidentally leave them in the oven a few minutes too long. Just be sure to trim any excess fat and adjust your cooking time—thighs may only need about 30–35 minutes depending on their size. The creamy topping pairs just as well with dark meat, and some folks even prefer it!
Can I make this dish ahead of time?
Yes, ma’am. This is a great make-ahead dish for busy weeknights or when you’re expecting company. You can season the chicken and add the creamy topping up to 24 hours in advance—just cover the baking dish tightly with foil or plastic wrap and store it in the fridge. When you’re ready to cook, let it sit on the counter for about 15 minutes while your oven preheats, then bake as usual.
Can I freeze it?
You sure can, but with a little note of caution. Cooked chicken freezes well, though the creamy topping may change texture slightly after thawing—it’ll still taste great, but it might not be as smooth. Let the dish cool completely, then wrap portions tightly in foil or store in airtight containers. It’ll keep in the freezer for up to 3 months. To reheat, thaw overnight in the fridge and warm in the oven at 325°F until heated through.
What can I substitute for mayo or sour cream?
If mayo’s not your thing, plain Greek yogurt makes a great substitute. It’s still creamy and tangy, but a bit lighter. Just be sure to use full-fat yogurt for the best texture. You can also use sour cream or do a half-and-half mix with mayo. The topping might be slightly less rich, but it’ll still bake up beautifully and keep your chicken nice and moist.